Nokia Mobile Best Tricks

Nokia Mobile Best Tricks

Mobile Tricks Logo

Nokia Mobile Tricks is one of the interesting Mobile Trick that is used to show your cool side In Your Friend Circle, I have listed few cool tricks to show of to your friends. This Tricks are also very informative to get your device informations.


To check Nokia mobile or cellphones IMEI (International Mobile Equipment Identity)
On the main screen type *#06#

Information you get from the IMEI (International Mobile Equipment Identity)                                ******—** —******–*
TAC–FAC–SNR-SP

TAC = Type approval code of your nokia Mobile
FAC = Final assembly code of your cellphone
SNR = Serial number of your nokia Phone
SP = Spare

Other secret tricks for Nokia mobile or cellphone
To check the phones Software revision for Nokia Mobile.
On the main screen type *#0000#

To enter in the secret menu in Nokia Phone.
On the main screen type *#92702689# [*#war0anty#]
It will take you to a secret menu where you may find some of the information below:
1. Displays Serial Number.
2. Displays the Month and Year of Manufacture
3. Displays (if there) the date where the phone was purchased (MMYY)
4. Displays the date of the last repair – if found (0000)
5. Shows life timer of phone (time passes since last start)

To restore Factory Settings for Nokia mobile
*#7780# reset to factory settings.

Taking picture without getting noticed.
Turn on/off the “click” sound made by the camera by selecting the ‘Silent’ profile or by turning warning tones on/off.

Hiding your Mobile/ Cellphone Number
Go to: Menu > Tools > Settings > Call > Send My Caller ID >
‘Yes’, ‘No’ or ‘Set By Network’ to follow the default settings of your home network.
It works only with very few network who provide you facility of “Private Number”

Speed Dialing From Simcard contact (not stored in mobile phonebook)
Type number followed by # then call.
Example: 1# or 2# or 21#

If you like this Article then I am sure you will like the following well researched articles too, come on check them out also

Come Connect with me On Social Media

How Change the Computer Administrator Password

How Change the Computer Administrator Password

Computer Administrator Password Changing

Suppose the operating system you use with your computer it requires a password to log in to that computer.And suppose one day You have opened your computer successfully with the proper password but because of some reason you just forgot the password and you are now fearing to shut down the computer because of the fact that you won’t be able to log in to the computer system again without remembering the proper password or else someone has opened their computer and left it open in front of you and He/She left the room and now as to make them nuts You are planning to change their password and play prank with them. Now you all know that it’s impossible almost to change the system password without knowing the original password hence we may need to format the whole system at the end. Then this Trick will be enough to amaze you all. If the System is turned on then just do the following to change the System Password, it won’t required the original system Password. The Trick is as follows :——


1) Open Command Prompt.
     Start » All Programs » Accessories
     » Command Prompt
2) Type net user and press Enter from keyboard.
It will show all the users of that particular computer.
3) Type net user ( user name from the list of users you want to change password for )
Example ====> net user Alen
It will show further information about that user.
5) Now type net user (The Username) (Shift+8)
Example =====> net user Alen *
6) Now type the Password you want to set for the user.
7) Now type the password again to Confirm it.
Now you are successfully done and now the Password has been changed for that User with the Password You have Given. Now You are all set to do the prank.
For more queries or any other info and solutions you can leave comments in the below or mail me at TechnoGenome@gmail.com .
Come and join Techno Genome group in Facebook. I hope the above article will grab some interest from your point of view.

Follow Techno Genome at :-

How To Access A Shared Drive On LAN

How To Access A Shared Drive On LAN

LAN Technology


Do You have more than one computer connected via LAN and wanna access to different Hard Drives from one computer.
To Map a Shared Drive on LAN Follow the Instructions :-

1) Open Command Prompt. (Start>Run>Type “cmd”> Press Enter from Keyboard).

2) In Command Prompt Type “ping” followed by IP Address of the Computer that Sharing the Drive.          Example : ping 192.168.111.123
3) Check if reply is coming, if not then make sure that the computer sharing the Drive is Connected on LAN Properly.
4) Then Type “net view \IP Address Of The Shared Computer”

         Example : net view \192.168.111.123

5) See which Drive is being Shared by the other Computer on the LAN.
6)Type “net use K: \IP Address Of The Sharing ComputerShared Drive”
Example : Suppose if the other Computer is Sharing it’s D: Drive then give the following Command

                                               net use K:\192.168.111.123D
***** The Above IP Address given “192.168.111.123” is just to show Examples of the Commands, That IP is not owned by me, so do not try to use it by any means or you will be the one to be guilty, try all of the above at Your Own Risk.

Follow Techno Genome at :-

How To Track An E-Mail To Know The Sender’s Location

How To Track An E-Mail To Know The Sender’s Location

E-Mail

Most of the people determine who sent them an E-Mail message By the “From” line in E-Mail. Unfortunately this symptomatic of the current confusion among internet users as to where particular messages come from and who is spreading spam and viruses. The “From” header is little more than a courtesy to the person receiving the message. People spreading spam and viruses are rarely courteous. In short, if there is any question about where a particular email message came from then we can only have information from “From” header, which 99.99% times can be forged.

So now how can we really get to know that from where a E-Mail has really came from????!!!!!, we can determine it using a simple E-Mail Tracing technique. We can easily find out the IP from which the E-Mail has been sent from, and from that we can actually know about the Service Provider which has been used by the Sender and also can find the Geographical location of that IP. We can find all of these using E-Mail Header

Symbol Of E-Mail
Getting The Header Of An E-Mail:
If you are using Outlook or Outlook Express you can view the headers by right clicking on the message and selecting properties or options.
To get the header from any other E-Mail Service like Gmail, Yahoomail and others follow the instructions:
  1. Open the E-Mail you want to Trace.
  2. Click on the Down arrow on the Action Button on the top of the currently opened E-Mail window.
  3. Click on “Show Full Header” from the list (For Yahoo Mail).
  4. The Header with the E-mail will open.


Finding The Sender’s IP From The Header:

Below are listed the headers of an actual Spam E-Mail I got. I’ve changed my E-Mail Address and Name for obvious reasons. I’m made the Important sections Bold and marked with Other Colour so that it can be easily found.


From DHL Fri Jun 17 08:37:55 2011
X-Apparently-To: xxxx_xx@yahoo.co.in via 121.101.151.130; Fri, 17 Jun 2011 15:01:44 +0530
Return-Path: <adminsotuipycw@dhl.com>
X-YahooFilteredBulk: 95.105.98.188
Received-SPF: none (mta1014.mail.in.yahoo.com: domain of adminsotuipycw@dhl.com does not designate permitted sender hosts)
X-YMailISG: 7CHT.sAcZArcXSU9MHHNVB7ea5RFL8uFntO1PyY0ozSZ1_kY
 1zmUTD8sio_bW2aWr2__Af6atzXHVSKE1J3YMonw.yZ3dsjbhhOCHu0cBY_C
 SbktDM03zC.24G26LvVdQZP1CieELOeOyyYMA7loUYIwpBtF9k2IquNgslqW
 6Bcks2Hdv4bKyhcW6YP8TCtkZ25LekXkeV_3k7vbM4a1ENe3CsRq9WDfUxV5
 NRBaXxft6zb6EUpSlMf_pUkUKuuPaDor5DqNfU7SCj9t3yaObOXkpTOg884A
 mBtTPjIn4YAJKy8As6JdtM0HN0An3o47EGu.B6ofhYlot14C69vTfwMyMFiX
 EZYG5.DBaqROrmvL.SFBNYtJk6jEemYZerk2PDyCS2cjOUORGUbNm7lBs7Qf
 FTXJSvAA5fterZM7ECi4M2vwvj5B99TWGiVI_7PjrTFSGQ9SXtbvGwgFo_Jv
 tmLyr4PBew5Yiu.5DA4kNUu39oiXmdpxb8nQzTuEIp8UNQwJUGfhxDB2mMbE
 XRdrVosMnU5XVvybqcr3HuFhxNlc6Lc1oTOSosm1emDbI0NNu8m9i3mJ6KcU
 _x5o83ZnyMEDGUTzqQi8rdVuwGhBq4b6K.cUwLB15hKvxdFbWWOZK4eIsRRg
 5pCMwh81nUasTSqkDRTWhcXeRmNGtSmPNcHyA.AtDInGU0GeBh5oWC0redWr
 bdIM8dn.MD6NS3s3Kjd5A.qPDJIizqZonlIKv9tigsP7_Bym6xtjIDD3QA9D
 r_o437Ouw0H4SGUfkU3fMSZMXcZLN28zHV_T0N4hXIU_KEAz6zDU_lRvMiyk
 UdLPTOZSwSpQh6NOaoR0KihJxOVppwYFrayMU.qkLGIQ4q_CNQ2W7TpzvrVd
 rvZ7Wv6U8I3z.L6WC6kuSkDbTPMdJZZy3hJAzeoBMXtj.4PTBRrbkkm.SElg
 G8tw5bcXri3lMklV4XTseFhGhIriUjp_1oT.rpmeP.5TiA4K956zugxpLhxR
 i4PNYUzXiDCV.EJQwW93PIyWY8MOnhvjTgpkBZw_DeUajsTATa58x8ZtKsTi
 qT9ZFFPWGlvr1z3WWInL3uv8Ij84lXTYq.r9OV3cJFkI7zv00SAq4duw.av4
 I1RPtp8hSFw9ee.a0l2R9Ldu.y_GnACVnlYqvUBtEhyrRNY.s.A5SDyW3I7T
 7RpKP0.3JLjjGTuAEiFZ4d2y4kj18.iT2CiYueL1OJLme2R4SW.Ui57wVaUa
 ZW8tyQXy.9bLBvtpmixDuE2rnf56yhhZ5mXclTF6KSpzWMJa6W4sopruEtyj
 EFrNXk.QYOrSmhrTYzqoPw75THIop4Xg6JfhdU6lI2Sb

X-Originating-IP: [95.105.98.188]

Authentication-Results: mta1014.mail.in.yahoo.com  from=dhl.com; domainkeys=neutral (no sig);  from=dhl.com; dkim=neutral (no sig)
Received: from 127.0.0.1  (HELO dhl.com) (95.105.98.188)
  by mta1014.mail.in.yahoo.com with SMTP; Fri, 17 Jun 2011 15:01:43 +0530
Received: from group21.345mail.com ([137.24.36.29]) by relay-x.misswldrs.com with LOCAL; Fri, 17 Jun 2011 10:19:31 +0100
Received: from [16.238.233.60] by rsmail.alkoholic.net with ASMTP; Fri, 17 Jun 2011 10:16:04 +0100
Received: from mail.gimmicc.net ([Fri, 17 Jun 2011 10:01:37 +0100])
    by mtu23.bigping.com with ASMTP; Fri, 17 Jun 2011 10:01:37 +0100
Received: from external.newsubdomain.com [198.204.245.168] by rly04.hottestmile.com with ESMTP; Fri, 17 Jun 2011 09:44:21 +0100
Received: from mtu67.syds.piswix.net ([Fri, 17 Jun 2011 09:37:55 +0100])
    by qrx.quickslick.com with ASMTP; Fri, 17 Jun 2011 09:37:55 +0100
Message-ID: <6b9701cc2cd2$3c4aa160$190b65a7@adminsotuipycw>

From: “DHL” <adminsotuipycw@dhl.com>
To: <srivastavagopi@yahoo.co.in>
Cc: <xxxx_xx@yahoo.co.in>,
    <uma_junnarkar@yahoo.co.in>,
    <vasanthi_ssa@yahoo.co.in>,
    <alsrajeshwari@yahoo.co.in>,
    <satish_ronnie07@yahoo.co.in>,
    <jitenderthakur1984@yahoo.co.in>,
    <satinderhundals@yahoo.co.in>,
    <bechundari@yahoo.co.in>,
    <omeshmahajan@yahoo.co.in>,
    <ms.shivam@yahoo.co.in>,
    <sathu_purush@yahoo.co.in>,
    <amysak@yahoo.co.in>,
    <vicky_vishal_000@yahoo.co.in>,
    <mani_elango@yahoo.co.in>,
    <rash_sweet90@yahoo.co.in>,
    <musicalgirl77@yahoo.co.in>,
    <skbadv@yahoo.co.in>

Subject: DHL Express Delivery hau
Date: Fri, 17 Jun 2011 09:37:55 +0100
MIME-Version: 1.0
Content-Type: multipart/mixed;
    boundary=”—-=_NextPart_844_A97B_D259C698.2FFE04C8″
X-Priority: 3
X-MSMail-Priority: Normal
X-Mailer: Microsoft Outlook Express 6.00.2800.1106
X-MimeOLE: Produced By Microsoft MimeOLE V6.00.2800.1106
Content-Length: 17531

According to the From header this E-Mail is from “DHL” adminsotuipycw@dhl.com, but is it really sent from there!!!!!!!!…… No No No……
The header most likely to be useful for determining the actual source of the email message. Now look at the X-Originating-IP: [95.105.98.188] it’s on the middle part of the Header. you can see a IP with it, it’s the IP of the original Sender of this E-Mail. Now we need track it, so Go to the www.ip2location.com and copy and paste the IP in the proper field which you found with the “X-Originating IP”, like here it’s 95.105.98.188, now search it and you will get the result. You will be able to see the ISP, Location, Time Zone, Internet Connection and many other Information about the Sender of that E-Mail, and you can even Trace location Geographically with the Map provided in on the Website. In the lower part of the E-Mail you can also see that it’s primarily sent to srivastavagopi@yahoo.co.in and then it has been also sent to all others at the same time what  you can clearly see on “Cc” the E-Mail Address list it has with it. So now Trace them out.

Follow Techno Genome at :-

How To Make Autorun enabled CD, DVD, Pendrive

How To Make Autorun enabled CD, DVD, Pendrive

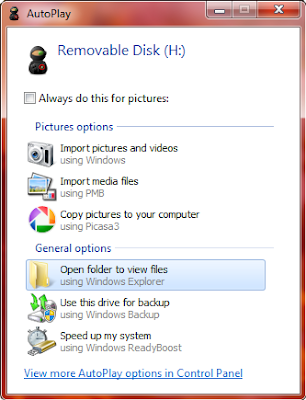
Autorun
Most of us knows about autorun but many of us doesn’t know about how it works. We have seen that when we insert some CD or DVD like Driver Disc or any other original Disc in computer it shows a window on the screen and along with a icon of it’s own, or even sometimes a programme gets run automatically when we insert a disc in the computer, and even when we open My Computer and see the Removable Drive we can see a Icon after inserting the Disc, but when we burn a disc then we can’t see anything if we insert the same, I mean no special Icon no autorun with for programme. We can even make our Pendrive autorun enable and also give them a Special Icon as per our choice. We can make CD, DVD, Pendrive Autorun enable with the same procedure for all

  • Open Notepad (Start > All Programs > Accessories > Notepad)
  • Type the following :
                              [autorun]
                              icon=myicon.ico
                              open=mybatchfile.bat
                              action=Click On OK Button To Run mybatch.bat
  • Save the file as autorun.inf
  • You will see a .inf file called autorun on the location where you have saved it
  • copy this file to the CD, DVD, Pendrive that you wanna make Autorun enable
  • Copy the Icon file on your CD/DVD/Pendrive and name it as “myicon”
  • Copy Batch File into your CD/DVD/Pendrive that you wanna run
Windows
Now if to make your CD/DVD/Pendrive to open a Programme without going into the drive when Clicked on the Removable drive through My Computer, then just add a extra line to it
                                [autorun]
                                icon=myicon.ico
                                open=mybatchfile.bat
                                action=Click On OK Button To Run mybatch.bat
                                shellopencommand=mybatchfile.bat
Now if we want to open a Webpage instead of a Programme when clicked through My Computer, suppose we want Techno Genome which has got the url “http://www.technogenome.blogspot.com”   then just modify the last line
                              [autorun]
                              icon=myicon.ico
                              open=mybatchfile.bat
                              action=Click On OK Button To Run mybatch.bat
                              shellexecute=http://www.technogenome.blogspot.com
***Always Copy all of the files above said in the root directory of your CD/DVD/Pendrive, don’t copy those files under any folders in your CD/DVD/Pendrive
Example :-
If your CD/DVD/Pendrive is assigned as H: then copy all the files into H:
Not into any folder of your CD/DVD/Pendrive like H:ABC

 *** Here I’ve just given a example as myicon.ico, mybatchfile.bat. But you can give any .exe or.bat or other Programs and any Icon. Just Change the name in the .inf File while you are creating it or you can also modify a existing .inf file by opening it with Notepad and saving the changes. Always keep the Icon and Program file name same that you put in the CD/DVD/Pendrive with the one in that autorun.inf, or otherwise the Autorun function won’t work
*** You can only use .ico file as Icon, You can get lots of .ico file from Internet.

Follow Techno Genome at :-

How To Chat Using Command Prompt

How To Chat Using Command Prompt

Chatting
Most of us have used Chatting Platforms like – G-Talk, Yahoo Messenger, Windows Live and all that, but most of us don’t know that our informations like what we are chatting and with whom these all are going through there servers, so they can easily track out what we are Chatting and all other stuffs. Sometimes it’s better to keep our Chatting a little Privet, may be because of it’s something confidential to share. And when we can make our own Chatting Platforms then why use there’s. To make your own Chatting Platform follow the Instructions below:

  1. Right Click over a blank space on Desktop.
  2. Go to New and from the Sub menu select Text Document.
  3. Open the Tet Document from Desktop by Double Left Click on it or by selecting it and pressing Enter.
  4. In the open Document Type the following —->
For Windows 7 & Windows Vista
                             

                                         @echo off
                                         :A
                                         cls
                                         echo Pulse by RC
                                         set /p d=Destination:
                                         set /p m=Say:
                                         msg %d% %m%
                                         pause
                                         goto A


For Previous Versions Of Windows

                                        @echo off

                                         :A
                                         cls
                                         echo Pulse by RC
                                         set /p d=Destination:
                                         set /p m=Say:
                                         net send %d% %m%
                                         pause
                                         goto A
    
    5. Go to File menu and Click on Save As.
    6. Give the Name Pulse.bat
    7. Click on Save button.
    8. Now you can find your own Chatting Platform “Pulse” on the location
        where you have saved it.
    9. Run the Pulse.
  10. Give the IP Address where you want to send the message and the
        Message you want to send.

Follow Techno Genome at :-