Ready Mix Concrete A Approach To Modern Concreting

Ready Mix Concrete A Approach To Modern Concreting

Ready Mix Concrete is one of the most advancement in concreting industry today. The concrete whose constituents are weigh batched at a central batching plant, mixed either at the plant itself or in Transit Mixer, and then transported to the construction site and delivered in a condition ready to use is what called as Ready Mixed Concrete or RMC.This enables the place of the manufacture and use of concrete being separated and connected by suitable transportation method. This type of concrete is useful in congested sites or at diverse work places and saves the consumer from the headache of acquiring materials for preparing concrete. RMC is made under factory conditions and in a controlled state  hence this is more durable and economical in terms of proper utilisation of the ingredients of concrete. The RMC can be produced according to the required properties such as Strength, Workability, Setting Time etc.

Ready Mixed Concrete
DISCHARGE OF READY MIXED CONCRETE FROM THE TRANSIT MIXER

Proportioning of the Ready Mixed Concrete :-

The Ready Mixed Concrete proportioning aims at obtaining an economical and practical combination materials to produce concrete with required properties for its intended use, such as workability, strength, durability and appearance. The following basics of a good concrete mix should be considered :-

  1. Concrete aggregates are required to meet appropriate specification.
  2. Fly Ash and other supplementary cementing materials which enhances the properties of concrete are normally added to the RMC. Least amount of water which can produce required workability must be used.
  3. Admixtures are commonly used in small quantities varying from 0.5% to 2% for improving properties of both fresh and hardened concrete such as setting time, workability, rate of strength development etc. mainly Water Reducers are used like Naptha Base, PCE or Polyvinyl Carboxylic Ether.


Production Of Ready Mixed Concrete :- 

First of all Concrete Mix Design is done to obtain the required mix proportions for the required strength and workability. Ready Mixed Concrete can be produced using any efficient concrete mixer including paddle mixer, free-fall mixers and truck mixers, but forced action mixers are generally preferred. Ready-made self-compacting concrete may take longer time to obtain complete mixing than for normal concrete due to reduction of frictional force and to fully activate the superplasticizer.
Admixtures should not be added directly to the dry constituent materials but dispensed together with or in the mixing water. Different Admixtures should not be blended together prior to adding.
The preferable procedure is to load the aggregates first together with cement, and this immediately followed by the main mixing water and superplasticizer.

Classification of Ready Mixed Concrete :- 

1)Transit Mixed Concrete :-
  • Concrete mixed at job site while travelling to the job site the drum is turned at agitating speed that is slowly. After arriving at the job site, the concrete is completely mixed. The Drum of the Transit Mixer is turned for 70 to 100 revolutions, or about five minutes at mixing speed.
  • Concrete mixed in the yard or central batching plant the drum is turned at high speed or 12-15 rpm for 50 revolutions. This allows a quick check of the batch. The concrete is then agitated slowly while driving to the job site.
  • Concrete mixed in transit the drum is turned at the medium speed or about 8 rpm for 70 revolutions while driving to the job site. The drum is then slowed to agitating speed.
 2) Shrink-mixed Concrete :-
  • Concrete that is partially mixed at the central batching plant and then discharged into the drum of the truck mixer for completion of the mixing is called Shrink-mixed Concrete.
3) Central-mixed Concrete :-
  • In this case concrete is fully mixed and prepared in the Central Batching plant and then carried to the job site by the truck mixers.

If you like this Article then I am sure you will like the following well researched articles too, come on check them out also

Come Connect with me On Social Media

Ready Mix Concrete A Approach To Modern Concreting

Concrete Cube Test To Determine Concrete Strength

Concrete Cube Testing to determine the strength of concrete can be done in both Destructive and Non-Destructive Methods of Testing. In Civil Engineering Jobs, Civil Engineering Construction Practice Cube test is one of the vital test which is performed to determine the strength of concrete which has been already used in the construction. Cube Testing is a Destructive Testing Method of Concrete Testing, as the cubes are crushed in Compression Testing Machine. The mostly tested cubes in practice are of 150x150x150 size in mm.
Here is How to Do The Cube Test Of Concrete.

Concrete Cube Mould
150x150x150 mm. CUBE MOULD

Apparatus :-

  • 150x150x150 mm. cube moulds 6 Nos.
  • Slide wrench 1 No.
  • Trowel 1 No.
  • 600mm long and 16mm Dia. Temping Rod 1No.
  • Nail 1 No.
  • Water Tank 1 No.
  • Steel Rule 1 No.
  • Compression Testing Machine
  • Soft Cloth 1 No.
  • Mallet 1 No.
  • Lubricating agent.

Raw Materials :-

Freshly prepared concrete that is Green Concrete which is to be tested.

Procedure :-

  1. First of all measure the mould for its Length, Breadth and Height all inner to inner dimensions accurately with the help of the steel rule.
  2. If there is any dimensions which deviates from Length x Breadth x Height = 150x150x150 mm. then loosen the nut bolts of the mould with the help of slide wrench and adjust it to the perfect 150x150x150 mm and tighten the nut and bolts again.
  3. Now lubricate the inside of the mould thoroughly with lubricating agent, which may be engine oil or Grease.
  4. Then pour the green concrete to be tested into the mould with trowel in Three Layers of each having height approximately 50mm so that three layers fulfill the cube mould as 50+50+50 = 150 mm. after pouring each layer, compact that layer with the help of the Temping Rod with the bullet  ended side stroking into the concrete for 35 Strokes.
  5. After Pouring each layer into the mould, struck the mould from outside on all four wall moderately with the help of mallet so that no honeycombs forms at the contact surface of the Concrete and the mould.
  6. After pouring all three layers according to the step 4 and 5, now trim of the top of the mould and finish it smooth with the help of trowel.
  7. Prepare 6 moulds filled with concrete in the same manner.
  8. Leave the moulds about 1 hour, then write the cube nos. as cube 1 cube 2……cube 6 and date on which they have prepared on the top surface of the concrete with the help of nail.
  9. After 24 Hours open the moulds by opening the nut bolts with the help of slide wrench and release all the 6 cubes from there moulds, and immerse completely all of these cubes under water in water tank at room temperature that is 28C +/- 2C.
    CUBE BEING TESTED ON COMPRESSION TESTING MACHINE
  10. At 7th day from the date of preparation of cubes take 3 cubes of the 6 cubes and soak the water on them with cloth and test them in compression testing machine, crush the cubes one by one and note the results on the compression testing machine.
  11. Do the same for the remaining 3 cubes at 28th day form the date preparation of the cubes, and note the results on the compression testing machine.
  12. Now calculate the Crushing strength for all cubes from the obtained results in terms of N/mm^2 by the following :-

The top surface area of each cube at Top is 150×150 = 22500 mm^2
suppose a cube tested at 7 days crushed at a loading of 310 KN then the Calculation will be as follows
30 KN = 310×1000 N = 310000N
Hence the Crushing Strength of that cube is
( Load at Crushing/Surface Area of Cube in Contact) = (310000/22500) = 13.78 N/mm^2

I hope now you will not have any problem on Concrete Crushing Strength Test. For any question or other comments please leave below in the comments section.

If you like this Article then I am sure you will like the following well researched articles too, come on check them out also

Come Connect with me On Social Media

Ready Mix Concrete A Approach To Modern Concreting

Shallow Foundation Of Different Types And Their Selection

 
Hi it has been long time since I’ve posted on my Techno Genome. It was due to my busy schedule, but now I’m back with bag full of things for every Civil Engineers out there.
Today I will discuss about Foundation, Specifically about Shallow Foundation. After follwing this post the readers will be able to answer and understand about the followings :-
  • What is Foundation?
  • What is the Deep Foundation and Shallow Foundation?
  • What are the different types of Shallow Foundation?
  • What type of Shallow Foundation is to be provided in which case?
ISOLATED COLUMN FOOTING

First of all let us understand what is Foundation and why these are required to be provide. To be precise a foundation can be defined as the lower most integrated part of a structure, which is in direct contact with the soil, and which safely transmits the whole load of the structure with the full stability of the structure to the soil beneath. So what does this all means? Its functions are as same like as that of our feet. A structure cannot be suspended in the air by it’s own, can it? so we have to give opposite and equal reaction to the direction from which the loads are coming. This done by providing the foundation, which transfers all the loads coming from the structure to the hard soil layer at certain depth, A foundation also gives lateral stability to the structure so that it does not Slide or Overturn.
There are two types of Foundation mainly, a) Shallow Foundation b) Deep Foundation. This two type of foundation is based on a criteria that is as follows, If the Breadth of the lower most portion of the foundation is grater than the depth of the lower most portion of the foundation from the top of the soil, that is Ground Level then it is called as a Shallow Foundation. And is the Breadth of the lower most portion of the foundation is lesser than the depth of the lower most portion of the foundation from the top of the soil, that is Ground Level then it is called as a Deep Foundation.
In most of the cases of light and moderately loaded structures like Residential Buildings up to 5 storied, and other general type of works shallow foundation is to be provided, but the soil must be not of poor quality with highly compressible soil and low bearing capacity. and in case of heavily loaded structures like High Rise Buildings, Bridges and Flyovers etc. deep foundation is to be provided. Deep foundation are the only most suitable method of providing foundation in case of poor soil condition. In this article I will only discuss about the Shallow Foundation, On a article sooner I’ll discuss about the Deep Foundation so keep visiting Techno Genome.
Actually there are many a types of shallow foundation which are to be provided  depending upon the site condition and type of loading and pattern. Namely :-

  1. Isolated Column Footing :- Isolated Column Footing is a very common type of foundation, and is provided in case of Framed Structure and Combined Framed and Load Bearing Structure for providing the foundation of a single column only.For each and every individual column a seperate Isolated Column Footing is to be provided with. This type of foundations can be of two types as a footing having uniform depth at all points of the footing, and a footing being slopped from the face of the column towards the edge of the footing. Sloped footing are much economical than footing with uniform depth.
  2. Combined Footing :- This footing are used when the footing area of one column overlaps the footing area of the other column. In this type of foundation Two or more Columns are provided within a single Footing, which maybe Rectangular or Trapezoidal depending upon the loading pattern on the columns to be provided with Combined Footing. If all columns are having almost equal load on them then Rectangular Footing is used and if the loading differs largely then Trapezoidal Footings are used, the width being greater to smaller from the side of column having greater load the column supporting comparatively lesser Loads.
  3. Continuous Strip Footing :- This is the oldest type of footing I think. This type of foundation is used for providing foundation to Wall, which may or may not be load bearing wall. Continuous Strip Footing are of two types, one made of P.C.C. and the Other is made of R.C.C. If you are planning to provide a continuous strip footing in the form of stepped from main wall thickness at plinth to the foundation width at the bottom of footing then P.C.C. are most economical, but in case of slightly compressible soil and higher loading intensities, R.C.C. Continuous Strip Footing should be used
  4. Strap Footing :- Strap Footing are nothing but an improvised type of Isolated Column Footing, in this type of foundation each isolated column footings are connected at the pedestal level with the adjacent isolated column footings on all four sides by Strap Beams. by connecting all isolated column footings with strap beams they all become bonded together hence they will resist the Differential  Settlements due to the compressibility or lowering of the pore water pressure in the subsoil. 
  5. Raft Foundation :- Raft Foundation are one of the best type of shallow foundation, and which are very effective where the bearing capacity of soil is low and there are chances of Differential Settlements. This type of foundation is generally provided for framed structures, and where the load on each column are are almost same. In this type of foundation a Hard solid base is prepared over which Primary and Secondary Beams are constructed according to the column position, so that the primary and secondary beams intersects each other at the positions where columns are located, and thus the columns are erected at the Nodal Points or points of intersection of the primary and secondary beams.
  6. Mat Foundation :- Mat Foundation are similar to that of the Raft Foundation, this is suitable where the soil is compressible and having low bearing capacity and there are very risk of differential settlement. The load on each column should be almost equal. In this type of foundation an Inverted Slab Beam is constructed monolithically, this means that the slab is at the bottom most part and above it the beam is casted at the same time. As in the case of the Raft the beams are position as primary and secondary beams as required and the columns are then erected from the Nodal Points.
  7. Grillage Foundation :- This type of Foundation are used generally only for providing foundation to the Steel Column, Column Under Huge Loading, and in the case of the Machine Foundation. In this Foundation R.S.J. and Concreting is done.
  8. Inverted Arch Type Foundation :- This type of foundation are mostly suitable for providing foundation for Arcade. In this, Brick or Concrete Arches are provided having Convexity Downwards, between all adjacent Columns. The Foundation Keeps its stability under the Arch Action.
  9. Cantilever Type Foundation :- This type of foundation is used when no sufficient space is available to provide the foundation for a column directly beneath it, but the column must placed in that particular position. In this case a cantilever beam is projected from the nearby column and at the free end of that Cantilever Beam The Column is Supported. Sometimes a Balancing Load is also applied on the other end without fixing the beam with the nearby Column.


If you like this Article then I am sure you will like the following well researched articles too, come on check them out also

Come Connect with me On Social Media

Ready Mix Concrete A Approach To Modern Concreting

Design Of Columns In Limit State Method with Building Example

Among the all structural Members the Design of Columns are very important yet the Design of Columns are much neglected. This importance of Structural nature of column is because if any other structural member say Beams or Slabs fails, it will cause only a local failure in that particular portion of the structure.
Whereas, failure of a column means that the of that particular column which has failed will have to be borne by the adjacent columns,hence it will give loads on the adjacent columns beyond their Design Limit. As due to this fact it may start a chain reaction of failures in columns and subsequently the whole structure may collapse. As in the Framed Structured Building that is in the modern day construction the Frames are formed by networks of Columns and Beams. Due to all this reason only even if vertical or Gravity loadings are considered the Design of Columns stands to be of much importance than any other structural Members.
 
A Column is a Structural Member which is vertical and axially loaded and subjected to Compressive forces, and having it’s Effective Length (Height) Three times greater than the least cross-sectional dimension of it self. To Satisfactorily Complete the  Design of Columns The Following Steps must followed.

STEP 1 :- Calculation of the Influence Area for Design of Columns :

The first step is to find out the Influence Area of the Column to be Designed. The Influence Area of a column is the area of which load is being transferred to the column to be designed for. For this purpose in a framed structure small and medium building the design of column is done for the column whose Influence Area is the largest hence the load coming on the column will be so the greater of the any other column in that building hence all the other column having lesser Influence Area hence lesser Loads if provided with the same Designed parameters that required for the column having largest Influence Area, then the whole Structure will automatically become safe against the Loads.
 
Design of Columns Influence Area
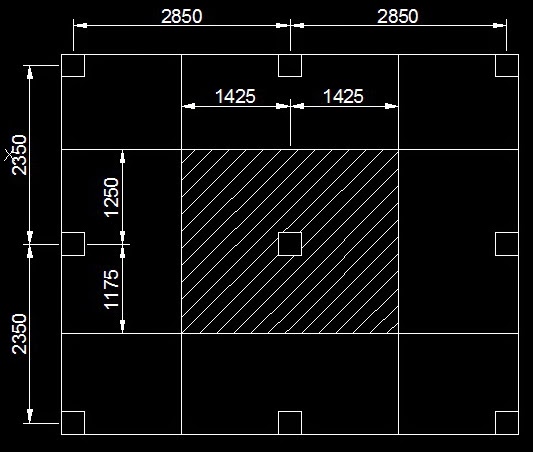
DETERMINATION OF INFLUENCE AREAS FOR LOAD DISTRIBUTION ON COLUMNS
 

STEP 2:- Calculation of the Loads Coming on Columns from the Influence Area :

In this step the Load Calculation is being done. This is done by calculating all the loads acting within the influence area.
The Loads acting are broadly classified as Dead Load (DL) and Live Load (LL). Dead Loads are the load of objects which cannot be moved from on place to another like the loads of Brick Work, Beams, Slabs etc. and the Live Loads are the loads coming from movable objects such as Humans, Chair, Table etc.
Thus We Need to Calculate the Dead Loads as well as Live Loads within the Influence Area, these are as follows in the general case of a Building :-
 
A)Dead Loads :
        I.            Due to weight of Slab                                    [25000 N/m3 ]
      II.            Due to weight of Floor Finish                        [500 N/m2]
    III.            Due to weight of Brick Masonry                   [19200 N/m3]
    IV.            Due to weight of Beam                                 [25000 N/m3]
      V.            Due to weight of Self Weight of Column        [25000 N/m3]
 
 
B) Live Load :

It depends upon the Nature of the Structure, and it values for different structural nature are given in the concerned Code of Practice, like in India these are given in I.S.: 875-Part II.

For Residential Buildings it is generally considered @ 2KN/m2 = 2000 N/m2
 
Column Shuttering Design of Columns
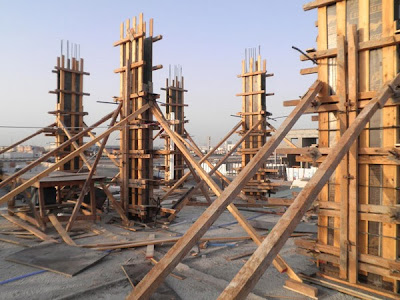
COLUMN FORM WORK OF BUILDING

Now after correct calculation of above loads the Total Load is Calculated by,

Total Load on each floor = Dead Load + Live Load
Now this the actual load which will be acting on column for each floor, now if the building say 5 storied, then just multiply the value with the nos. of floors, like for five storied building multiply the Total Load on each story with 5.
Now thus the Total load acting on column at Column Base is Obtained and it is denoted with ‘P’.
Hence P= Total Load on each Floor X Nos. of Stories = (Dead Load + Live Load) X Nos. of Stories.
Now we shall move to the actual Designing to determine suitable Column sections and its Reinforcements so that the above load is safely resisted by the column Designed.
It can be done by Three main Methods of Design : a) Working Stress Method b) Ultimate Load Method and c) Limit State Method.
The Modern Practice is to use Limit State Method for all types of Designing, Hence I’ll discuss here the Limit State Method Of Design Of Columns.

STEP 3 :-Finding The Gross Cross-Sectional Area Required For The Design of Columns :

This is the one of the most important and main step of the Design of Columns.
First in the Limit State Method of Design of Columns we must increase the load acting on the column with a Load Factor so that if there will be any accidental increase of loads the column will be still safe to resist the load without a failure. The Factor of Safety for Dead Load + Live Load Combination is 1.5, hence we must multiply the load action on column (P) with the 1.5 to obtain the Ultimate Load that is the Factored Load of the Column that is Pu.
Hence Factored Load, Pu = 1.5 X P
For Design we will work with this value of load.
Now before going on I’m here to say that I will design according to the Code Of Practice of I.S.: 456-2000
The Ultimate Load of a Column is given by,
 
Pu = 0.4.fck.Ac + 0.67.fy.Asc   [Equation I]
Where, Pu = Ultimate Load of the Column in N/mm2
              fck= Yield Strength of Concrete in N/mm2
              Ac = Area of Concrete (Cross-Sectional Area) of Column in mm2
               fy = Yield Strength Of Steel in N/mm2
            Asc= Area of Steel (Cross-Sectional Area) in Column in mm2
 
Now the column consists of Concrete and as well as Steel in the form of Reinforcements hence the Total Cross-Sectional Area of Column is made of Area of Concrete and Area of Steel.
 
The Total Cross-Sectional area of Column can be also termed as Gross Cross-Sectional Area of Column and it’s denoted by Ag.
Hence, Gross Cross-Sectional Area of Column = C/S  Area of Concrete + C/S Area of Steel
Therefore, Ag = Ac + Asc
And hence, Ac = Ag – Asc
 
Now putting the above obtained value in the original equation (Equation I) we get,
Pu = 0.4.fck.(Ag-Asc) + 0.67.fy.Asc  [Equation II]
Now Assume the Percentage of Steel you want to use ranging anywhere from 0.8% to 6% with Respect to Gross Cross-Sectional Area of the Column (Ag). Say Assuming Steel as 1% of Ag it means Area of Steel Asc = 1% of Ag = 0.01Ag
 
The higher will be the percentage of steel used the lower will be Ag and thus lesser will be the cross-sectional dimension of the column. But the as the Price of Steel is very high as compared to the Concrete hence it is desirable to use as less as steel possible to make the structure economical, again if the percentage of steel is lowered then the Ag will increase at higher rate, about 30% with decrease of just 1% of steel and so each lateral dimension of the column will increase and will cause a gigantic section to be provided to resist the load. Therefore both the factors are to be considered depending upon the amount of loading.
 
My suggestion is to use the following Percentage of steel for the Design of Column, Which I’ve found to be effective and to produce economical and safe section of Column.


Loading (Pu) in N             Percentage Of Steel  for Satisfactory Design

Below 250000 ——————————————–0.8%
250,000 to 500,000 ————————————–1.0%
500,000 to 750,000 ————————————–1.5%
750,000 to 1000,000 ————————————-2.0%
1000,000 to 1500,000 ———————————–2.5%
1500,000 to 2000,000 ———————————–3.0%
 
And so on, with increase of each 250,000 N increasing the Percentage of Steel as 0.5%.
 
Now  input the value of the Asc in the form of Ag in the Equation I. For example suppose 1% Steel is used then the equation will be like the one below :-
Pu = 0.4.fck.(Ag-0.01Ag) + 0.67.fy.0.01Ag
 
Therefore, if we know the Grade of Concrete and Grade of Steel to be used and Factored Load coming on the Column and Assuming the Percentage of steel required appropriately then we can Very Easily Calculate the Gross-Sectional Area (Ag) of the Column required from the above form of the equation.
Now as the Ag is obtained thus the Lateral Dimensions of the Column that are the sides of the column can be easily determined.
 
The Ag or Gross-Sectional Area of the Column means that it is the product of the two lateral sides of a column [i.e. Breadth (b) X Depth (D)], hence reversely knowing the Ag we can determine the Lateral Dimensions.
For making a Square Section just Determine the Root Value of the Ag. Like if the Value of Ag is 62500 mm2Then considering square section of a column we can get each side
Square Column Section Design of Columns
Also Rectangular Column Sections Can be made by using different proportion say b : D = 1 : 2 , Hence D=2b , Therefore, Ag = b X D = b X 2b = 2b2 or b=
 
Gross-Sectional Area Of Design of Columns
Hence D can be also determined as D=2b after Calculating the b.
Most of the times after calculating the sides of a column it will give results such as 196.51mm or 323.62 etc. values, which practically cannot be provided at field, hence we must increase those values to the nearest greater multiple of 25mm (i.e. 1 inch). For examples a value of 196.51mm may be increased to 200mm or 225mm or 250 mm even, and a value of 323.62mm may be increased to 350mm. more it will be increased the more it will be safer, but it is uneconomical to increase by a very high amount, it should not be increased more than by 75mm to consider the economical factor.

STEP 4 : Check For Long/Short Columns:

 
Depending upon the ratio of Effective Length to the Least Lateral Dimension of a column, a column may be classified as Long Column and Short Column. If the value of this ratio is less than 12 then it’s called as a short column and if the value is more than 12 then it’s called as a Long Column. A short column mainly fails by direct compression and has a lesser chance of failure by buckling. And in the case of a long column the failure mainly occurs due to the buckling alone. Long column being slender, that is being thin like stick as compared with its length it grows a tendency to get bend by deviating from its vertical axis under the action of loads. Due to this tendency of long column to get buckled (bend) a long column of all same properties and dimensions that of a short column will be able to carry much lesser load safely than that of the short column.
 
Suppose a 400mmx400mm short column can take a load of 1000KN , then a long column of 400mmx400mm having same grade of concrete, same amount of reinforcement and same workmanship will be able to carry a lesser load like say about 800KN only, hence we get a loss of 200KN which is 20% loss of load carrying capacity. So the above formula used in Step 3 holds good only for the Short Column. For using it in long column a little modification is needed, which I will update it later when I will get hands on this article again. For now let us concentrate on Short Column. First of all we need to find out the effective length of a column, which can be obtained by multiplying a factor with the actual unsupported length of the column. The factor depends upon the end condition of the column. In most general cases we use a Both End Fixed Column for which The Factor is 0.65.
 
Therefore, Effective Length = Effective Length Factor (0.65) x Unsupported Length (l). suppose a column has a unsupported length of 2.7m = 2700mm, hence the effective length will be lef = 0.65×2700 = 1755mm. Least lateral dimension means the shorter of the two dimensions of column that is length and breadth. But in case of a circular column as there is only diameter, hence we will use the diameter.
 
Suppose a column is of 400mmx200mm section and has an unsupported length of 2700mm, then the Ration of Effective length t the Least Lateral Dimension will be as follows :-
(Effective Length/Least Lateral Dimension) = (lef/b) = (1755/200) = 8.775 which is less than 12 and hence is a Short Column.
 

STEP 5  Check For Eccentricity for Design of Columns :

Eccentricity means deviating from the true axis. Thus an Eccentric Load refers to a load which is not acting through the line of the axis of the column in case of column design. The eccentric load cause the column to bend towards the eccentricity of the loading and hence generates a bending moment in the column. In case of eccentric loading we have to design the column for both the Direct Compression and also for the bending moment also. Practically all columns are eccentric to some extent which may vary from few millimetres to few centimetres. In practical field it is almost impossible to make a perfectly axially loaded column, as a reason we have to consider a certain value of eccentricity for safety even though if we are designing for a axially loaded column. The conditions of considering eccentricity and its value may differ from code to code according to the country.
 
Here I will tell you what I.S. : 456-2000 says. According to it the eccentricity which we have to consider for design must be taken as the greater of the followings :-
i) 20mm.
ii) (lef/500) + (b/30)
Where,
lef = Effective Length of the Column
b = Lateral Dimension of the Column (We have to calculate two separate values for two sides in case of rectangular column)
Permissible Eccentricity :- 0.05b where b is the dimension of a side of a column, we have to check for two sides separately in case of rectangular column.

The Permissible eccentricity must be greater than or equal to the actual eccentricity of the column. Or else we have to design it for bending also.

STEP 6 :-Calculating The Area Of Steel Required for Design of Columns :

Now the Area of Steel Required Asc is to be calculated from the Ag as the predetermined percentage of Ag. For example if the Gross-Sectional Area of the Column is 78600 mm2and at the starting of calculation of Ag it was assumed that 1% Steel is used then we get,
Asc = 1% of Ag = 0.01Ag = 0.01 X 78600 = 786 mm2
Now we shall provide such amount of Reinforcements that the Cross-Sectional Area of the Reinforcement provided is Equal to or Greater than the Cross-Sectional Area of Steel required above.
Hence in the above case we shall Provide 4 Nos. of 16mm Diameter Bars
Hence, The Actual Area of Steel Provided,
Area Of Steel In Column
Hence the Area of Steel Provided is Greater than Area Of Steel Required, Hence the Structure will be Safe.
 
NOTE : The minimum of 4 Nos. of Bars to be provided at the four corners of a rectangular or Square Columns and minimum diameter of Bars that to be used is 12mm Diameter. Hence 4 Nos. of 12mm Diameter Bars are must in any Columns irrespective of their necessities.
 

STEP 7 :-Determining The Diameter and Spacing Of The Lateral Ties for Design of Columns:

In this step we will Determine the Diameter and the Spacing of the Lateral Ties or Transverse Links or Binders.
 
The Diameter of the Ties shall not be lesser than the Greatest of the following two values 

  1.  6mm 
  2.  1/4th of the Diameter of the Largest Diameter Bar
 
For an example if a Column has 16mm and 20mm both types of bar as Longitudinal Bars or main Reinforcement then 1/4th of 20mm = 5mm Hence we shall provide 6mm diameter Ties.
 
The Spacing of Ties shall not exceed the least of the followings three values 

  1.  Least Lateral Dimension 
  2. 16 Times of the Diameter of the Smallest Diameter Longitudinal Bar 
  3. 48 Times of the Diameter of Ties
 
For an example A Column of 250mm X 350mm Dimension having 20mm and 16mm Diameter Longitudinal Bars and 6mm Diameter Ties we get,

  • Least Lateral Dimension = 250mm 
  • 16 Times of the Diameter of the Smallest Diameter Longitudinal Bar = 16 X 16 = 256mm 
  • 48 Times of the Diameter of Ties = 48 X 6 = 288mm
Hence Provide 5mm Diameter Ties @ 250mm C/C                                                                       

[In this case our objective is to minimize the value to reduce the spacing and to make the structure more stable, hence we shall take least value and suitably in a multiple of 25mm]


If you like this Article then I am sure you will like the following well researched articles too, come on check them out also

Come Connect with me On Social Media

Ready Mix Concrete A Approach To Modern Concreting

Nokia Mobile Best Tricks

Mobile Tricks Logo

Nokia Mobile Tricks is one of the interesting Mobile Trick that is used to show your cool side In Your Friend Circle, I have listed few cool tricks to show of to your friends. This Tricks are also very informative to get your device informations.


To check Nokia mobile or cellphones IMEI (International Mobile Equipment Identity)
On the main screen type *#06#

Information you get from the IMEI (International Mobile Equipment Identity)                                ******—** —******–*
TAC–FAC–SNR-SP

TAC = Type approval code of your nokia Mobile
FAC = Final assembly code of your cellphone
SNR = Serial number of your nokia Phone
SP = Spare

Other secret tricks for Nokia mobile or cellphone
To check the phones Software revision for Nokia Mobile.
On the main screen type *#0000#

To enter in the secret menu in Nokia Phone.
On the main screen type *#92702689# [*#war0anty#]
It will take you to a secret menu where you may find some of the information below:
1. Displays Serial Number.
2. Displays the Month and Year of Manufacture
3. Displays (if there) the date where the phone was purchased (MMYY)
4. Displays the date of the last repair – if found (0000)
5. Shows life timer of phone (time passes since last start)

To restore Factory Settings for Nokia mobile
*#7780# reset to factory settings.

Taking picture without getting noticed.
Turn on/off the “click” sound made by the camera by selecting the ‘Silent’ profile or by turning warning tones on/off.

Hiding your Mobile/ Cellphone Number
Go to: Menu > Tools > Settings > Call > Send My Caller ID >
‘Yes’, ‘No’ or ‘Set By Network’ to follow the default settings of your home network.
It works only with very few network who provide you facility of “Private Number”

Speed Dialing From Simcard contact (not stored in mobile phonebook)
Type number followed by # then call.
Example: 1# or 2# or 21#

If you like this Article then I am sure you will like the following well researched articles too, come on check them out also

Come Connect with me On Social Media